
Ghosting with Cake Soiree

Hello, welcome to the April Go for Greece Blog Hop which is a part of the Go For Greece demonstrator training group. A supportive and sharing community has built up and is led by Kylie Bertucci. 
As part of the Go For Greece group are all working towards achieving the Stampin’ Up! annual trip this year, which is a trip to the Greek Isles for two people, wouldn’t that be just amazing!!!!!?

I'm working with one of my favourite suites today - sentimental as I did a presentation of the Sweet Soiree Suite at the Melbourne OnStage event in November, so very close to my heart as whilst doing a presentation in front of 100's of demonstrators was way out of my comfort zone, the "personal stretch" to do so was so rewarding.

My card today features the "ghosting technique", what's that you say? In a nut shell you create the illusion  of a  lighter shadow behind  a main colour focal point by stamping with white craft ink first and then with colour over the top, slightly offset. 


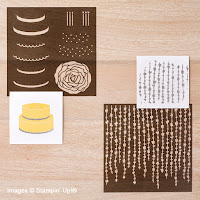
I started by using Crumb Cake card stock and sponging the large flower from the Sweet Soiree Decorative masks with white craft ink - make sure your ink pad is nice and juicy so you get extra good coverage with your white ink stamping, one dry I used daubers to apply Rich Razzleberry, Berry Burst and Powder Pink to create an ombre effect. I repeated the process with the smaller flowers using the Cake Soiree stamps set and cut using the Sweet Cake Framelits. Lastly adding the sentiment from Flourishing Phrases.


Here is the full list of hop participants. Hop around and take a look at everyone’s projects, I'm sure you'll get loads of creative inspiration!


Whilst the Cake Soiree Stamp set and Sweet Cake Framelits are carrying over to the new Annual Cataloge, sadly the rest of the Suite including the Sweet Soiree Decorative Masks are retiring, so if you simply must have this set the time is NOW - only available while stocks last or til 31st May - you can also currently purchase the stamp set and framelits as a bundle and SAVE 10% til 31st May.


 Cake Soiree Bundle       Sweet Soiree Decorative Masks

Got some items on your wish list, or just need to stock up? Click below to see if any of your favourite products are retiring - get them now, or you may miss out! 

 Last-Chance Products

Thanks for visiting today, I hope you enjoyed viewing my project.  I would love to update you when I create a post! If you would like to receive an email from me when I do Click Here. You can also subscribe for my newsletter for Stampin' Up news, updates and Sales. 
Check out the 4 Limited Time Bundles available to celebrate the Share What You Love Suite, as well as the 2018-2020 InColors here

Why not turn something you love into so much more....By joining my team and getting the Stampin' Up!® Starter kit for $169 and you get to choose $235 of ANY current Stampin' Up!® product when you join, including the exclusive Share What You Love Bundles - such a great offer, too good to miss!  I would LOVE to welcome you to my team - Ink Obsession, why not JOIN NOW


When shopping  remember to use the current Hostess code displayed at the top of my blog at the check out and you will be eligible for a Thank You gift for for shopping with me  - Learn more here - be sure to click YES that you allow me as your demonstrator to contact you in your account settings otherwise I won't be able to forward your Thank You gift. 


Comments

  1. What a stunning card Sue. I love this ghosting technique and must give it a try, you rocked that presentation by the way! xx

    ReplyDelete
  2. Thats an amazing card Sue....I will definitely be having a go at that ghosting technique

    ReplyDelete
  3. a very nice card you've made. I love the colors

    ReplyDelete
  4. Hi Sue, my fellow South Aussie! :) Wow, this is an gorgeous card, you have really achieved dimension in these flowers ... and adore the colours! xxx

    ReplyDelete
  5. Stunning Sue!!!! I'm yet to play with the ghosting technique. Love your card!!!

    ReplyDelete
  6. Such a pretty card Sue and a great technique. Thanks

    ReplyDelete
  7. Beautiful use of this stamp set, Sue, and I love your choice of colors!

    ReplyDelete

Post a Comment

Thanks for taking the time to write a comment - you have made my day!

Popular posts from this blog

Thank you for everything Hues of Happiness

Hello crafty friends, I'm using one of my favourite layouts today with the simply gorgeous Hues of Happiness DSP . I decided to make the card using Pool Party cardstock to complement the blue flowers in a bed of purples, I think it turned out lovely. I added detail to the card front by using the Scalloped edge from the Scalloped Contours Dies , and heat embossed a sentiment in silver from the Color & Contour stamp set .  To finish I added a touch of bling with Rhinestone  Basic Jewels . Thanks for visiting today, I hope you enjoyed viewing my project. Stay tuned for more inspiration and tips this month. I’ve listed the products I used below, just click on the picture and be taken directly to the product.  I truly appreciate your support, it inspires me to keep crafting and helps to keep my blog and YouTube channel running. If you live in Australia and don't already have a Demonstrator I'd love to be yours.  Hues of Happiness DSP Scalloped Contour Dies   Color & Cont

Color Fusers Blog Hop May 2023

Hello everyone, it's the beginning of a new month, so that means it's time for this month's Color Fusers Monthly Blog Hop! This month, is all about the new 2023-2025 InColors! There is also a colour refresh, so lots of new colours are on there way, but today I am super excited to try out Moody Mauve, my favourite from this group. I've done 2 tone stamping so you can see first and second generation colours of Moody Mauve using the Two-Tone Flora stamp set, as well as blending the ink on to Moody Mauve cardstock using a Artistic Mix Decorative mask . As you can see Moody Mauve is stunning in both a pastel (2nd generation stamping) as well as full depth. I've combined with Basic Grey...... I may have done a booboo with my pre-order and missed Pebbled Path; but based on the sample of Pebbled Path I have, it would be perfect companion for Mood Mauve  To finish I added "thanks" from Sentimental Park , and some Basic Rhinestones for just a touch of bling. Be su

Fancy Folds Stampers Showcase - Hues of Happiness Circle Easel Card

Hello there crafters! You are going to love today's Stamper Showcase Blog Hop - we are all featuring FUN FOLDS, I just love a fun fold, I should really do more of them! I decided to a Circle Easel Card, it's a smaller card, but I think you will agree is just super cute, and with the Hues of Happiness DSP is just Gorgeous! This card is a relatively simple for a fun fold and comes together very quickly - I think I spent more time doing the floral arrangement than the actual fun fold itself. I took advantage of being able to die cut images directly from the Hues of Happiness DSP - I love it when we can do this with DSP, and aren't the flowers just stunning! I took 3 different flowers and some foliage and arranged to fit within the Basic White Circle cut from the largest circle die in Layering Circles Dies set, and the largest scallop die is used for the coloured section of the card. To create the card base you need to fold a piece of card stock and positon the largest die slig

Color Fusers Blog Hop June 2023

Hello everyone, it's the beginning of a new month, so that means it's time for this month's Color Fusers Monthly Blog Hop! This month, our creations will feature the new pink - Bubble Bath, the returning Pretty Peacock, and Pool Party. I decided on the pastel approach, I began with creating my background with a paper stencil cut using the cloud die from Basic Borders , working from Pretty Peacock to Pool Party and finishing with Bubble Bath towards the bottom of the card, moving the stencil a little each time so as to not have identical clouds in a line. I was excited to try a creation with the Beautiful Balloons Bundle - I traced the outside edge of the balloon die then blended each colour, leaving the right hand side a little lighter, the inked up the "detail" stamp for the balloons just on the left and stamped.  Once die cut, I then stamped the ribbon and sentiment, before mounting the balloons with Dimensionals . Be sure to continue on through the rest of t

All Star Design Team - Lighter Than Air

Hello crafters, a new month, means a new bundle from the All Star Design Team. This month we are showcasing the Lighter than Air suite  from the Mini Catalogue. The All Star Design Team not only design a Tutorial Project that’s exclusive but we also each design an additional project to share here for further inspiration. Like my tutorial, I've featured the Designer Series Paper for my card - this paper is sooooooooo pretty! Pastel yet bright, it's a win win for me. The Hot Air Balloon bundle is fantastic too - stamp your own balloon's and die cut in your choice of colours, and detailed dies, the possibilities are endless! Lighter than Air Inspiration Below is a sneak peek of what’s in store with this month’s Bundle. You’ll see my teaser in the bottom left of the image.  There is more inspiration from the Team within this Blog Hop and another twelve designs in the  Bundle this month. There is more Lighter than Air inspiration from the Team within this Blog Hop and as well as