
Crazy Crafters Blog Hop | Special Guest Paula Dobson


Welcome to the Crazy Crafters Blog Hop, today we have the super talented Paula Dobson from New Zealand joining us special guest! What makes today so great is that we get to CASE a project and hop along with Paula - Awesome! We hope you find great inspiration from the projects. The full blog lineup below will help you move along to see all the projects.

so love Paula's style, I spent quite some time viewing her amazing work, then I found it, here is the card I decided to CASE:


There are so many aspects of this card I adore, the colours, the sunset, the layers, but what most drawn to was the sponging technique - I'm normally a clean lines kinda girl, but I really liked the rugged hills and foreground and those sunset layers, what I was inspired to create:


I created the mounds of snow by tearing paper, yes you heard right, I didn't cut I, tore the paper! I've used Smoky Slate and Soft Sky for sponging snow using the torn paper as a mask at the base of the beautiful trees from Thoughtful Branches  - I didn't ink the stamp to the bottom of the trees so it looks like the snow is piled up high. To create the Gold edging I used Gold Stampin' Emboss Powder around the edge of a piece of card stock - here's a here is a picture from a card I made last year to give you a visual of what the embossed edge looks like before all the layers are put together


 Emboss the edge of a layer of cardstock to perfectly match you embossed sentiment!


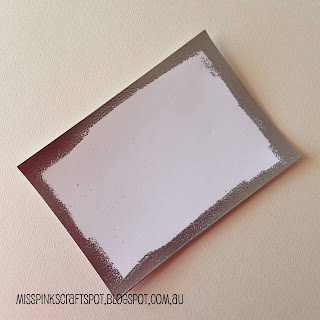
One of the reasons I love doing this is that border then perfectly matches the embossed sentiment. I love the combination of Gold with Always Artichoke - makes for an elegant Christmas Card don't you think?

I would love it if you could pin my cards! Make sure you hop all the way around our Crazy Crafters hop and see all the incredible ideas and creations, and if you have a chance please leave a comment, we love receiving comments! You are currently on my blog - Sue Vine, check who is below me and that is where to head to next! Thanks for hopping with us.


Thanks for visiting today, I hope you enjoyed viewing my project.  I would love to update you when I create a post! If you would like to receive an email from me when I do Click Here. You can also subscribe for my newsletter for Stampin' Up news, updates and Sales. 

Why not turn something you love into so much more....By joining my team and getting the Stampin' Up!® Starter kit for $169 and you get to choose $235 of ANY current Stampin' Up!® product including this special limited time bundle. I would LOVE to welcome you to my team - Ink Obsession.  JOIN NOW

When shopping  remember to use the current Hostess code displayed at the top of my blog at the check out and you will be eligible for a Thank You gift for for shopping with me  - Learn more here - be sure to click YES that you allow me as your demonstrator to contact you in your account settings otherwise I won't be able to forward your Thank You gift. 

Comments

  1. You have created a beautiful scene Sue :") I also love tearing paper & here it has certainly helped to make the snow mounds realistic. Awesome CASE x

    ReplyDelete
  2. Love all the details Sue! Lovely card. I haven't tried the embossing powder on edges. It's a good idea.

    ReplyDelete
  3. Your card is gorgeous Sue.....I love the idea of embossing the edges....very clever

    ReplyDelete
  4. I LOVE you card! The scene really has the soft sky, watery sun, snowiness that reminds me of childhood Christmases.

    ReplyDelete
  5. Really, really lovely, Sue! Great colour combo & the snow is so real! xx

    ReplyDelete
  6. Loving the snow and how you have sponged them in Sue, just love it.Angexo

    ReplyDelete
  7. What a beautiful card. That layer of gold is superb.

    ReplyDelete
  8. Gorgeous card Sue. Love how you've embossed the edge of the layer under the trees, what a great idea :)

    ReplyDelete
  9. WOW Sue ... nice I will have to remember the heat embossing frame trick I always just seem to go straight for the foil this would make it so much more economical :) Thanks for sharing!

    ReplyDelete
  10. Gorgeous card Sue. Love all the details especially the gold embossed edge/frame tying in with the sentiment. :)

    ReplyDelete
  11. Hi Sue! Your card is divine!! I love the lovely snow scene you have created with your gorgeous sponging! The gold embossed edges frame your artwork beautifully. Thanks you so much for your kind words on my work. I t was my pleasure to hop with you xox

    ReplyDelete
  12. Great Christmas card, love the gold border idea, looks quick and easy to shade and stamp and complete the card.

    ReplyDelete
  13. I love the embossed edges. What a great idea!!

    ReplyDelete

Post a Comment

Thanks for taking the time to write a comment - you have made my day!

Popular posts from this blog

Thank you for everything Hues of Happiness

Hello crafty friends, I'm using one of my favourite layouts today with the simply gorgeous Hues of Happiness DSP . I decided to make the card using Pool Party cardstock to complement the blue flowers in a bed of purples, I think it turned out lovely. I added detail to the card front by using the Scalloped edge from the Scalloped Contours Dies , and heat embossed a sentiment in silver from the Color & Contour stamp set .  To finish I added a touch of bling with Rhinestone  Basic Jewels . Thanks for visiting today, I hope you enjoyed viewing my project. Stay tuned for more inspiration and tips this month. I’ve listed the products I used below, just click on the picture and be taken directly to the product.  I truly appreciate your support, it inspires me to keep crafting and helps to keep my blog and YouTube channel running. If you live in Australia and don't already have a Demonstrator I'd love to be yours.  Hues of Happiness DSP Scalloped Contour Dies   Color & Cont

Color Fusers Blog Hop May 2023

Hello everyone, it's the beginning of a new month, so that means it's time for this month's Color Fusers Monthly Blog Hop! This month, is all about the new 2023-2025 InColors! There is also a colour refresh, so lots of new colours are on there way, but today I am super excited to try out Moody Mauve, my favourite from this group. I've done 2 tone stamping so you can see first and second generation colours of Moody Mauve using the Two-Tone Flora stamp set, as well as blending the ink on to Moody Mauve cardstock using a Artistic Mix Decorative mask . As you can see Moody Mauve is stunning in both a pastel (2nd generation stamping) as well as full depth. I've combined with Basic Grey...... I may have done a booboo with my pre-order and missed Pebbled Path; but based on the sample of Pebbled Path I have, it would be perfect companion for Mood Mauve  To finish I added "thanks" from Sentimental Park , and some Basic Rhinestones for just a touch of bling. Be su

Fancy Folds Stampers Showcase - Hues of Happiness Circle Easel Card

Hello there crafters! You are going to love today's Stamper Showcase Blog Hop - we are all featuring FUN FOLDS, I just love a fun fold, I should really do more of them! I decided to a Circle Easel Card, it's a smaller card, but I think you will agree is just super cute, and with the Hues of Happiness DSP is just Gorgeous! This card is a relatively simple for a fun fold and comes together very quickly - I think I spent more time doing the floral arrangement than the actual fun fold itself. I took advantage of being able to die cut images directly from the Hues of Happiness DSP - I love it when we can do this with DSP, and aren't the flowers just stunning! I took 3 different flowers and some foliage and arranged to fit within the Basic White Circle cut from the largest circle die in Layering Circles Dies set, and the largest scallop die is used for the coloured section of the card. To create the card base you need to fold a piece of card stock and positon the largest die slig

Color Fusers Blog Hop June 2023

Hello everyone, it's the beginning of a new month, so that means it's time for this month's Color Fusers Monthly Blog Hop! This month, our creations will feature the new pink - Bubble Bath, the returning Pretty Peacock, and Pool Party. I decided on the pastel approach, I began with creating my background with a paper stencil cut using the cloud die from Basic Borders , working from Pretty Peacock to Pool Party and finishing with Bubble Bath towards the bottom of the card, moving the stencil a little each time so as to not have identical clouds in a line. I was excited to try a creation with the Beautiful Balloons Bundle - I traced the outside edge of the balloon die then blended each colour, leaving the right hand side a little lighter, the inked up the "detail" stamp for the balloons just on the left and stamped.  Once die cut, I then stamped the ribbon and sentiment, before mounting the balloons with Dimensionals . Be sure to continue on through the rest of t

All Star Design Team - Lighter Than Air

Hello crafters, a new month, means a new bundle from the All Star Design Team. This month we are showcasing the Lighter than Air suite  from the Mini Catalogue. The All Star Design Team not only design a Tutorial Project that’s exclusive but we also each design an additional project to share here for further inspiration. Like my tutorial, I've featured the Designer Series Paper for my card - this paper is sooooooooo pretty! Pastel yet bright, it's a win win for me. The Hot Air Balloon bundle is fantastic too - stamp your own balloon's and die cut in your choice of colours, and detailed dies, the possibilities are endless! Lighter than Air Inspiration Below is a sneak peek of what’s in store with this month’s Bundle. You’ll see my teaser in the bottom left of the image.  There is more inspiration from the Team within this Blog Hop and another twelve designs in the  Bundle this month. There is more Lighter than Air inspiration from the Team within this Blog Hop and as well as