Many Messages with Hand-Penned #loveitchopit


Hello crafters! Do you struggle to make the "first cut" in a piece of Designer Series paper - it's something I'm working to improve on, because once I make that cut I really do like the cards I create with DSP. 
What better way to get you mojo going than to challenge yourself with a sketch - have a Pinterest Board where I pin sketches or card layouts to come back to if I'm drawing a blank for inspiration, here's one of them:

I've taken the sketch quite literally, and decided to use products using the Hand Penned suite - Designer Series Paper and Memories & More cards. I used complimentary designs of the Hand Penned DSP for my background pieces, and a card from the Memories & More pack for the focal centre image.


To add some more interest to the card I layered each piece of DSP onto Basic White cardstock to give a tiny border, and then attached the largest layer with multi-purpose glue, and each layer after that with Dimensionals, giving height to the additional layers.
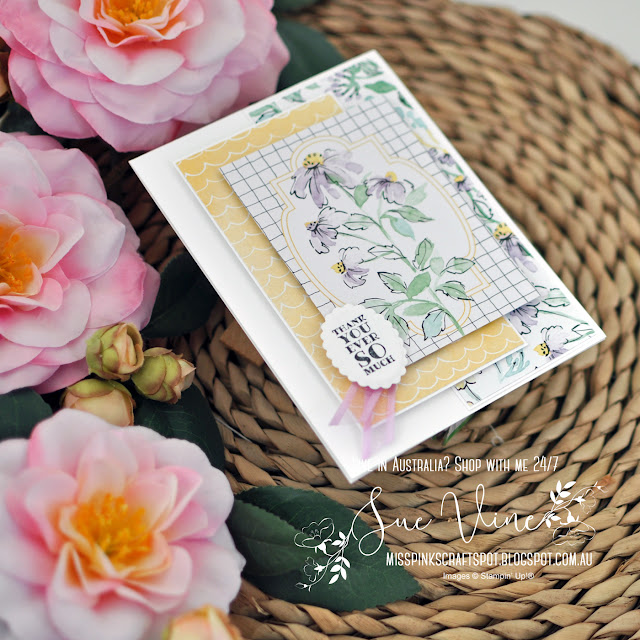


My sentiment is from the Many Messages stamp set, cut using the Messages Dies - I used an oval cut instead of the square intended in the layout of the stamp/die. To give it a bit more punch I ran the blunt round pen end (not the end you write with) around the inside of the die before removing the die cut - it gives a raised impression from the inside of the scalloped edge.


To finish I added a touch of Fresh Freesia open weave ribbon under the sentiment, and there you have it, my completed card. 

Thanks for visiting today, I hope you enjoyed viewing my project. Stay tuned for more inspiration and tips this month. I’ve listed the products I used below, just click on the picture and be taken directly to the product. 

I truly appreciate your support, it inspires me to keep crafting and helps to keep my blog and YouTube channel running. If you live in Australia and don't already have a Demonstrator I'd love to be yours. 


When shopping remember to use the current Hostess code displayed at the top of my blog at the check out and you will be eligible for a Thank You gift for for shopping with me - be sure to click YES that you allow me as your demonstrator to contact you in your account settings otherwise I won't be able to forward your Thank You gift.
I would love to update you when I create a post. If you would like to receive an email from me when I do Click Here. You can also subscribe for my newsletter for Stampin' Up news, updates and Sales. 


Join Stampin' Up! during Sale-A-Bration
During this Sale-a-bration there is an AWESOME promotion! Here it is in a nutshell (January 4 – February 28, 2022), Join My Team:
  • You PAY just $169
  • You CHOOSE $235 of ANY products ($66 worth items FREE)
  • FREE Postage on the Starter Kit (save $11.75)
  • AND enjoy 20% discount on future purchases
  • PLUS – During Sale-a-bration you will receive
Two FREE Stamp Sets 
ANY stamp sets, ANY value (except those in SAB Brochure)


more craft supplies for less $$$ - such an amazing offer, too good to miss!  
I would LOVE to welcome you to my team - Ink Obsession, why not JOIN NOW
When you join, there is absolutely no pressure to sell. However, if you want to turn this hobby into a business, by joining my team, I can help with that too.


Look what's on offer from the All Star Tutorial Bundle this Month!

The PDF will be emailed to you upon payment being received 
(please allow for time zone differences)
Purchase the PDF tutorial for AU$21 no matter where you are in the world
(no product purchase required)

OR
for a limited time you can sign up for our 
-oOo- All Star Tutorial Bundle Subscription  -oOo-
This means you get one month of tutorials FREE, woot! That's right, you sign up for six months at AU$21per month installments x 5 months = you get 1 month FREE.  That's a total 72 incredible tutorials that will receive over 6 months for only $105 in total - lots of inspiration to get you creating.


OR

The PDF will be emailed to you upon payment being received 
(please allow for time zone differences)


If you are currently a Stampin’ Up!® demonstrator, these tutorials are a great source for ideas using current products, taking the hassle out of preparing for classes.Each of the 12 tutorials have been created by top Stampin’ Up!® demonstrators from around the world and include measurements in both metric (cm) and imperial (inches). The step by step instructions and supply lists will help you learn new techniques and re-create these beautiful creations.

Comments

Popular posts from this blog

Fancy Folds Stampers Showcase - Hues of Happiness Circle Easel Card

Hello there crafters! You are going to love today's Stamper Showcase Blog Hop - we are all featuring FUN FOLDS, I just love a fun fold, I should really do more of them! I decided to a Circle Easel Card, it's a smaller card, but I think you will agree is just super cute, and with the Hues of Happiness DSP is just Gorgeous! This card is a relatively simple for a fun fold and comes together very quickly - I think I spent more time doing the floral arrangement than the actual fun fold itself. I took advantage of being able to die cut images directly from the Hues of Happiness DSP - I love it when we can do this with DSP, and aren't the flowers just stunning! I took 3 different flowers and some foliage and arranged to fit within the Basic White Circle cut from the largest circle die in Layering Circles Dies set, and the largest scallop die is used for the coloured section of the card. To create the card base you need to fold a piece of card stock and positon the largest die slig...

Thank you for everything Hues of Happiness

Hello crafty friends, I'm using one of my favourite layouts today with the simply gorgeous Hues of Happiness DSP . I decided to make the card using Pool Party cardstock to complement the blue flowers in a bed of purples, I think it turned out lovely. I added detail to the card front by using the Scalloped edge from the Scalloped Contours Dies , and heat embossed a sentiment in silver from the Color & Contour stamp set .  To finish I added a touch of bling with Rhinestone  Basic Jewels . Thanks for visiting today, I hope you enjoyed viewing my project. Stay tuned for more inspiration and tips this month. I’ve listed the products I used below, just click on the picture and be taken directly to the product.  I truly appreciate your support, it inspires me to keep crafting and helps to keep my blog and YouTube channel running. If you live in Australia and don't already have a Demonstrator I'd love to be yours.  Hues of Happiness DSP Scalloped Contour Dies   Colo...

ESAD Holiday Catalogue Fancy Folds & 3D Projects

Welcome to the ESAD Holiday Catalogue Fancy Folds & 3D project Blog Hop. We're so excited to share our creations with you and we're certain that you will find great tips and inspiration from all our creations. The full lineup below will help you move along the hop, so grab a cuppa and enjoy! I've created a project using one of my favourite fun folds - a "z-fold", using the Snowflakes Sentiments Bundle The thinlits give the card lots to detail, and did take a bit of time to put together, but hey if I'm honest I overthink the the placement of the swirls and snowflake sentiments like 3 - 4 times before I stick them down, hahaha!, but I must say every minute was worth it, I am really happy with the finished card. Perfect Plum made the perfect companion for Soft Sky and Marina Mist and I also designed the height of the card so that when it folds flat it will fit in a normal C6 envelope Thanks so much for stopping by. I hop...

Crazy Crafters Blog Hop January 2016

Welcome to the Crazy Crafters January Blog Hop, I can't believe that Connie Stewart is our special guest this month!    That's right, this month Connie Stewart is joining us! I made contact with Connie about 9 mths ago after seeing one of her 2.0 Flash Cards tutorials, and the rest is history - I am now part of Crazy Crafters and feeling very honoured that Connie has joined us for our January blog Hop.  To celebrate this, I have decided to show case the Sale-A-Bration stamp set "What I Love", as it is very similar to the stamp set that started me on my Stampin Up! journey. I just adore both the 3 step flowers and the sentiments in this set! I have also stamped the inside of the card I have also made a 2nd project so show that you can also create your own DSP using this lovely set, this time a special "thank you" box It is specially designed to fit 12 tea lights I hope you have found inspiration from my pro...

I'm in Love!.... Introducing the Parisian Beauty Bundle

Welcome to the ESAD Mini and Sale-a-bration Blog Hop. We're so excited to share our creations with you and we're certain that you will find great tips and inspiration from all our creations. The full lineup below will help you move along the hop, so grab a cuppa and enjoy! Well, what can I say...I'm in Love! The Parisian Beauty Bundle is just amazing.... I have so many ideas running around in my head for this set it's crazy, I have partially completed projects all over my desk, I finally knuckled down and completed this one to share with you today. This is my first attempt at a "DL" size card too, and I must say, I quite like the tall and skinny proportions of this card size. II wanted to use the new Champagne Rhinestones, so I I decided  on a Petal Pink and Crumb Cake colour combination. The background was stamped using the Stamparatus, so easy to get consitant spacing by just moving the plate a notch, and of so effective. I ...